Building a conference slide-sharing bot
Have you ever attended a conference or workshop where you wish the presenter could easily share their slides? Or, are you a presenter and you'd like to share your slides with the audience in a frictionless way?
The Idea
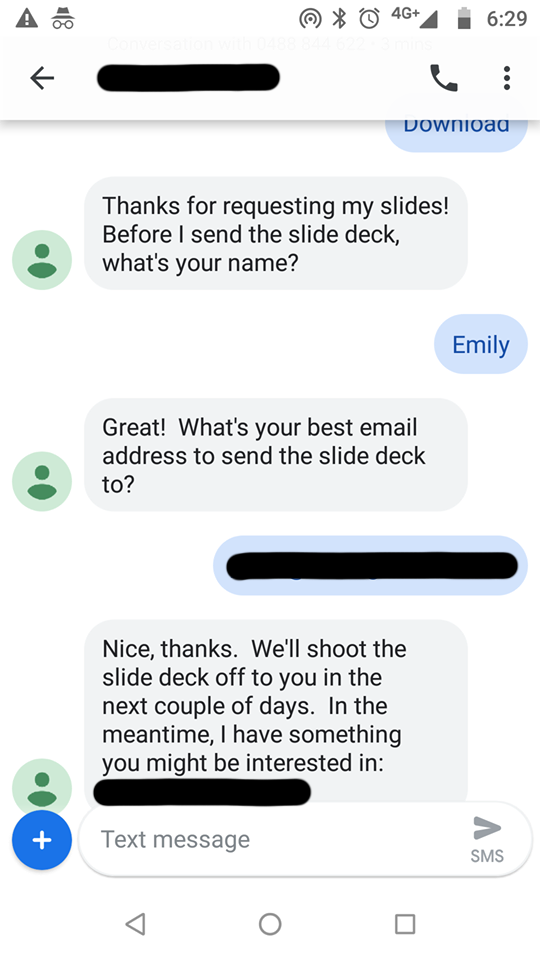
Last week I was having tea with my friend Emily from Coding Kids, and she showed me this screenshot of her phone from a recent presentation she had attended.
At the end of the presentation, there was a slide that said something like "to get a copy of this presentation, send the word download to ...". However, after supplying her details, she was yet to receive the presentation.
The presenter had done a great job but failed to automate the final step of actually sending the email!
We figured it could be automated using something like Twilio for sending and receiving SMS, and Zapier to automate the interactions. But we thought the ongoing costs of these two separate services made it an unpalatable solution.
The Goal
I had a look at Twilio to see if it was possible to build a bot without using Zapier, and it was, using two new Twilio features called Flows and Functions. These are both part of Twilio Studio.
Twilio Studio is like a visual programming tool, it's pretty limited, but Functions let you write javascript to do more complex tasks.
It also occurred to me that it might be possible to send an SMS by way of a QR code rather than getting attendees to enter a phone number and message.
It turns out that this is entirely possible and I found the answer here.
Finally, I wanted to store the captured contact data into a simple CRM or some other storage mechanism. For prototyping, I used AirTable as it has a nice REST / SDK interface and a free trial.
Making it Happen
First, you'll need to register for accounts on the following three platforms. Don't worry, they all offer free-trials, except Twilio where you're going to have to pay $1-5 for an SMS number.
-
Twilio (for SMS handling and workflow)
-
SendGrid (to send the email with attachment)
-
AirTable (to capture the supplied participant details)
-
Set up a Twilio number which is "SMS capable". This will require you to add some credit to your Twilio account (minimum $20).
-
Set up a SendGrid account and create a new API key with "Send Email" permissions. Store this API key in a safe place as you'll need it later.
-
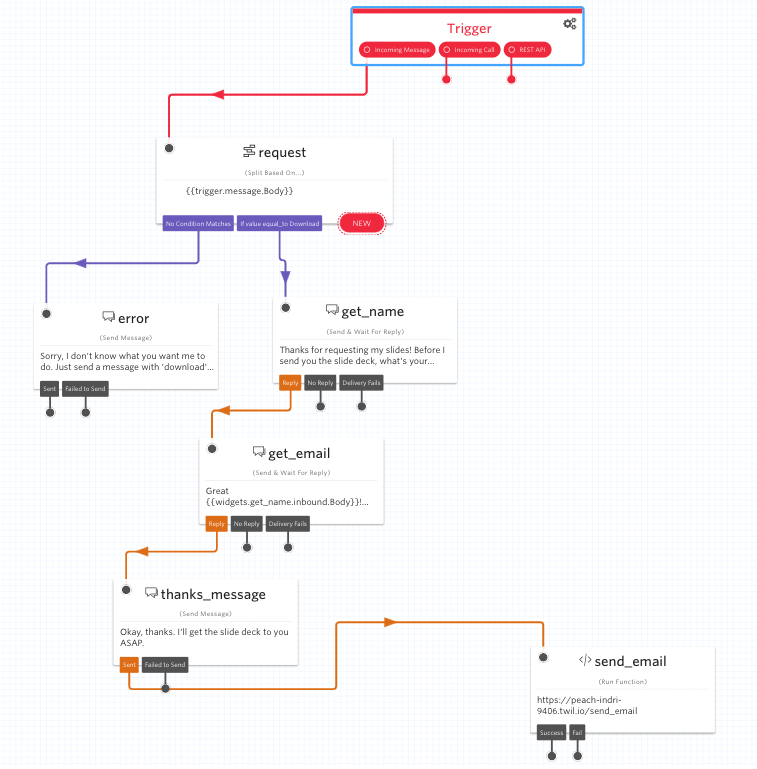
Create a new Flow in the Twilio Studio. I called mine "Send Slides".
-
This is what it will eventually look like, the steps to get there are below.
Add widget blocks
Add the following blocks from the widget library using the configuration below, and then join the flows between the blocks as per the above diagram.
Block Name
Block Type
Details
request
Split Based On
Variable to test: trigger.message.Body
If no condition matches: error
If value equal: download go to get_name
error
Send Message
Message body: Sorry, I don't know what you want me to do. Just send a message with 'download' if you want to receive a copy of my slides.
get_name
Send & Wait For Reply
Message body: Thanks for requesting my slides! Before I send you the slide deck, what's your name?
get_email
Send & Wait For Reply
Message body: Great {{widgets.get_name.inbound.Body}}! What's the best email address to send it to?
thanks_message
Send Message
Message body: Okay, thanks. I'll get the slide deck to you ASAP.
send_email
Run Function
Function URL: Send Email
Function Parameters:
TO_NAME: {{widgets.get_name.inbound.Body}}
TO_EMAIL: {{widgets.get_email.inbound.Body}}
TO_PHONE: {{widgets.get_name.inbound.From}}
- Create a new Function, either by clicking "CREATE" in the Run Function widget or through the "Runtime" section in the Twilio Studio. I called my function "Send Email" and gave it a path of "/send_email". Paste the following code into the function.
- Add the following Environment Variables under the Configure section of the Twilio Studio. The names and case are important as these variables are referenced from within the code below.
- FILENAME
- FROM_EMAIL
- FROM_NAME
- MESSAGE
- SENDGRID_API_KEY
- SUBJECT
- AIRTABLE_API_KEY
- AIRTABLE_BASE
- AIRTABLE_TABLE
- Add the following dependencies under the Dependencies section within Twilio Studio:
- @sendgrid/mail
- airtable
Send Email Function Code
exports.handler = function(context, event, callback) {
  const sgMail = require('@sendgrid/mail');
  const fs = require('fs');

  const file = Runtime.getAssets()[context.FILENAME].path;
  const utf8content = fs.readFileSync(file);
  const base64content = new Buffer(utf8content).toString('base64');

  const Airtable = require('airtable');
  var base = new Airtable({ apiKey: context.AIRTABLE_API_KEY }).base(
    context.AIRTABLE_BASE
  );

  base(context.AIRTABLE_TABLE).create(
    {
      Name: event.TO_NAME,
      Email: event.TO_EMAIL,
      Phone: event.TO_PHONE
    },
    function(err, record) {
      if (err) {
        console.error('AirTable Error', err);
        return;
      }
    }
  );

  sgMail.setApiKey(context.SENDGRID_API_KEY);
  const msg = {
    to: { name: event.TO_NAME, email: event.TO_EMAIL },
    from: { name: context.FROM_NAME, email: context.FROM_EMAIL },
    subject: context.SUBJECT,
    text: context.MESSAGE,
    attachments: [
      {
        content: base64content,
        filename: context.FILENAME
      }
    ]
  };

  sgMail
    .send(msg)
    .then(response => {
      callback(null, { email_sent: true });
    })
    .catch(reason => {
      if (reason && reason.response && reason.response.body) {
        console.log(reason.response.body);
      }
      callback(null, { email_sent: false });
    });
};